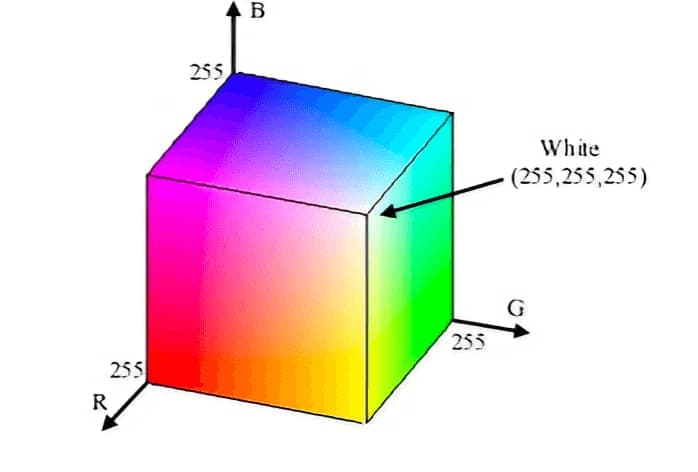
RGB色彩模式是由红、绿、蓝三原色组合而成的色彩模型,可用数字的方式描述我们看到的颜色,其中每种颜色的强度用0~255之间的数字表示,因此,我们可以通过RGB知道每种颜色的值。
单击此处进入示例页面
获取和处理颜色数据
步骤1.原始数据
 颜色列表
颜色列表
我们可以从 RGB 到颜色名称映射(三元组和十六进制) 中获取一些颜色数据及其英文名称。接下来让我们对其进行处理。在控制台中运行以下几行代码:
1
2
3
4
5
6
7
8
9
10
11
12
13
14
| copy(
Array.prototype.filter
.call(document.querySelectorAll("tr"), (item) => {
return (
item?.children?.length === 6 && item?.children?.[0].tagName !== "TH"
);
})
.map((item) => {
return {
name: item.children[0].innerText,
rgb: item.children[2].innerText,
};
})
);
|
然后我们可以得到一个名为colorList的颜色数据数组,这个数组已经被上面的程序复制到系统剪贴板中了,这个数组的结果如下:
1
2
3
4
5
6
7
8
9
10
11
| [
{
"name": "Grey",
"rgb": "84;84;84"
},
{
"name": "Grey, Silver",
"rgb": "192;192;192"
},
...
]
|
Step2. 去除重复数据
Next, we use the uniqBy method from lodash to remove duplicates from our color array.
copy(_.uniqBy(colorList, 'rgb'))
Step3. 格式化
将颜色数据中的RGB值分离为单独的属性,以方便后续步骤的搜索和计算。
1
2
3
4
5
6
7
8
9
10
11
| copy(
colorList.map((item) => {
const [r, g, b] = item.rgb.split(";");
return {
name: item.name,
r,
g,
b,
};
})
);
|
核心函数:根据RGB(A)值获取颜色名称。
 color-mapping
使用RGB坐标系来描述颜色的基本原理已经非常清楚了。这种方法使我们能够在三维空间中描述任何颜色,其中颜色的XYZ坐标就是其RGB值。通过这种方法,我们可以直观地了解每种颜色在空间中的位置以及它们相对于彼此的相对位置。
一旦我们获得了每种颜色的所有坐标,我们就可以使用基本的数学算法来计算空间中任意两种颜色之间的距离。根据我们对距离的定义,我们可以获得从目标颜色到每种已知颜色的距离,然后按大小排序以找到最接近的匹配。
该算法的核心在于计算两种颜色之间的距离。我们可以使用一个简单的公式:两点之间的距离等于它们在每个维度上的差的平方和的平方根。也就是说,对于 2D 平面上的两个点 (x1,y1) 和 (x2,y2),它们的距离 d 可以表示为:
d = √[(x1-x2)^2 + (y1-y2)^2]
类似地,我们可以将三维平面上点之间的距离表示为:
d = √[(x1-x2)^2 + (y1-y2)^2 + (z1-z2)^2]
这里,(x1,y1,z1)和(x2,y2,z22)表示 RGB 坐标系内两种颜色的坐标。
通过计算所有已知颜色和目标颜色之间的距离,我们可以确定哪个颜色最接近。如果有必要在仅基于接近度搜索相似颜色时考虑非线性属性(例如使用更高级的算法,如 CIEDE2000),那么这些方法可能会进一步提高准确性;但是大多数情况下,仅使用简单的基于接近度的计算就应该可以满足要求。
在此示例中,从图像中获得的颜色还包括一个 alpha 通道,它表示透明度。我们可以通过将 alpha 除以 255 来获得其介于 0 和 1 之间的值(对应于 CSS rgba 的 alpha 值)。如果它等于零,那么无论其 RGB 值如何,它都将是完全透明的颜色。
getColor1
2
3
4
5
6
7
8
9
10
11
12
13
14
15
16
17
18
19
20
21
22
23
24
25
26
27
| function getColor(r, g, b, a) {
if (a === 0) {
return {
name: "Transparent",
name_zh: "透明色",
r: null,
g: null,
b: null,
a: null,
hex: null,
};
}
const colorList = [];
let minDistance = 1000000;
let res = null;
for (let i = 0; i < colorList.length; i++) {
const distance =
Math.pow(r - colorList[i].r, 2) +
Math.pow(g - colorList[i].g, 2) +
Math.pow(b - colorList[i].b, 2);
if (distance <= minDistance) {
minDistance = distance;
res = colorList[i];
}
}
return res ? { ...res, a } : null;
}
|
用户界面
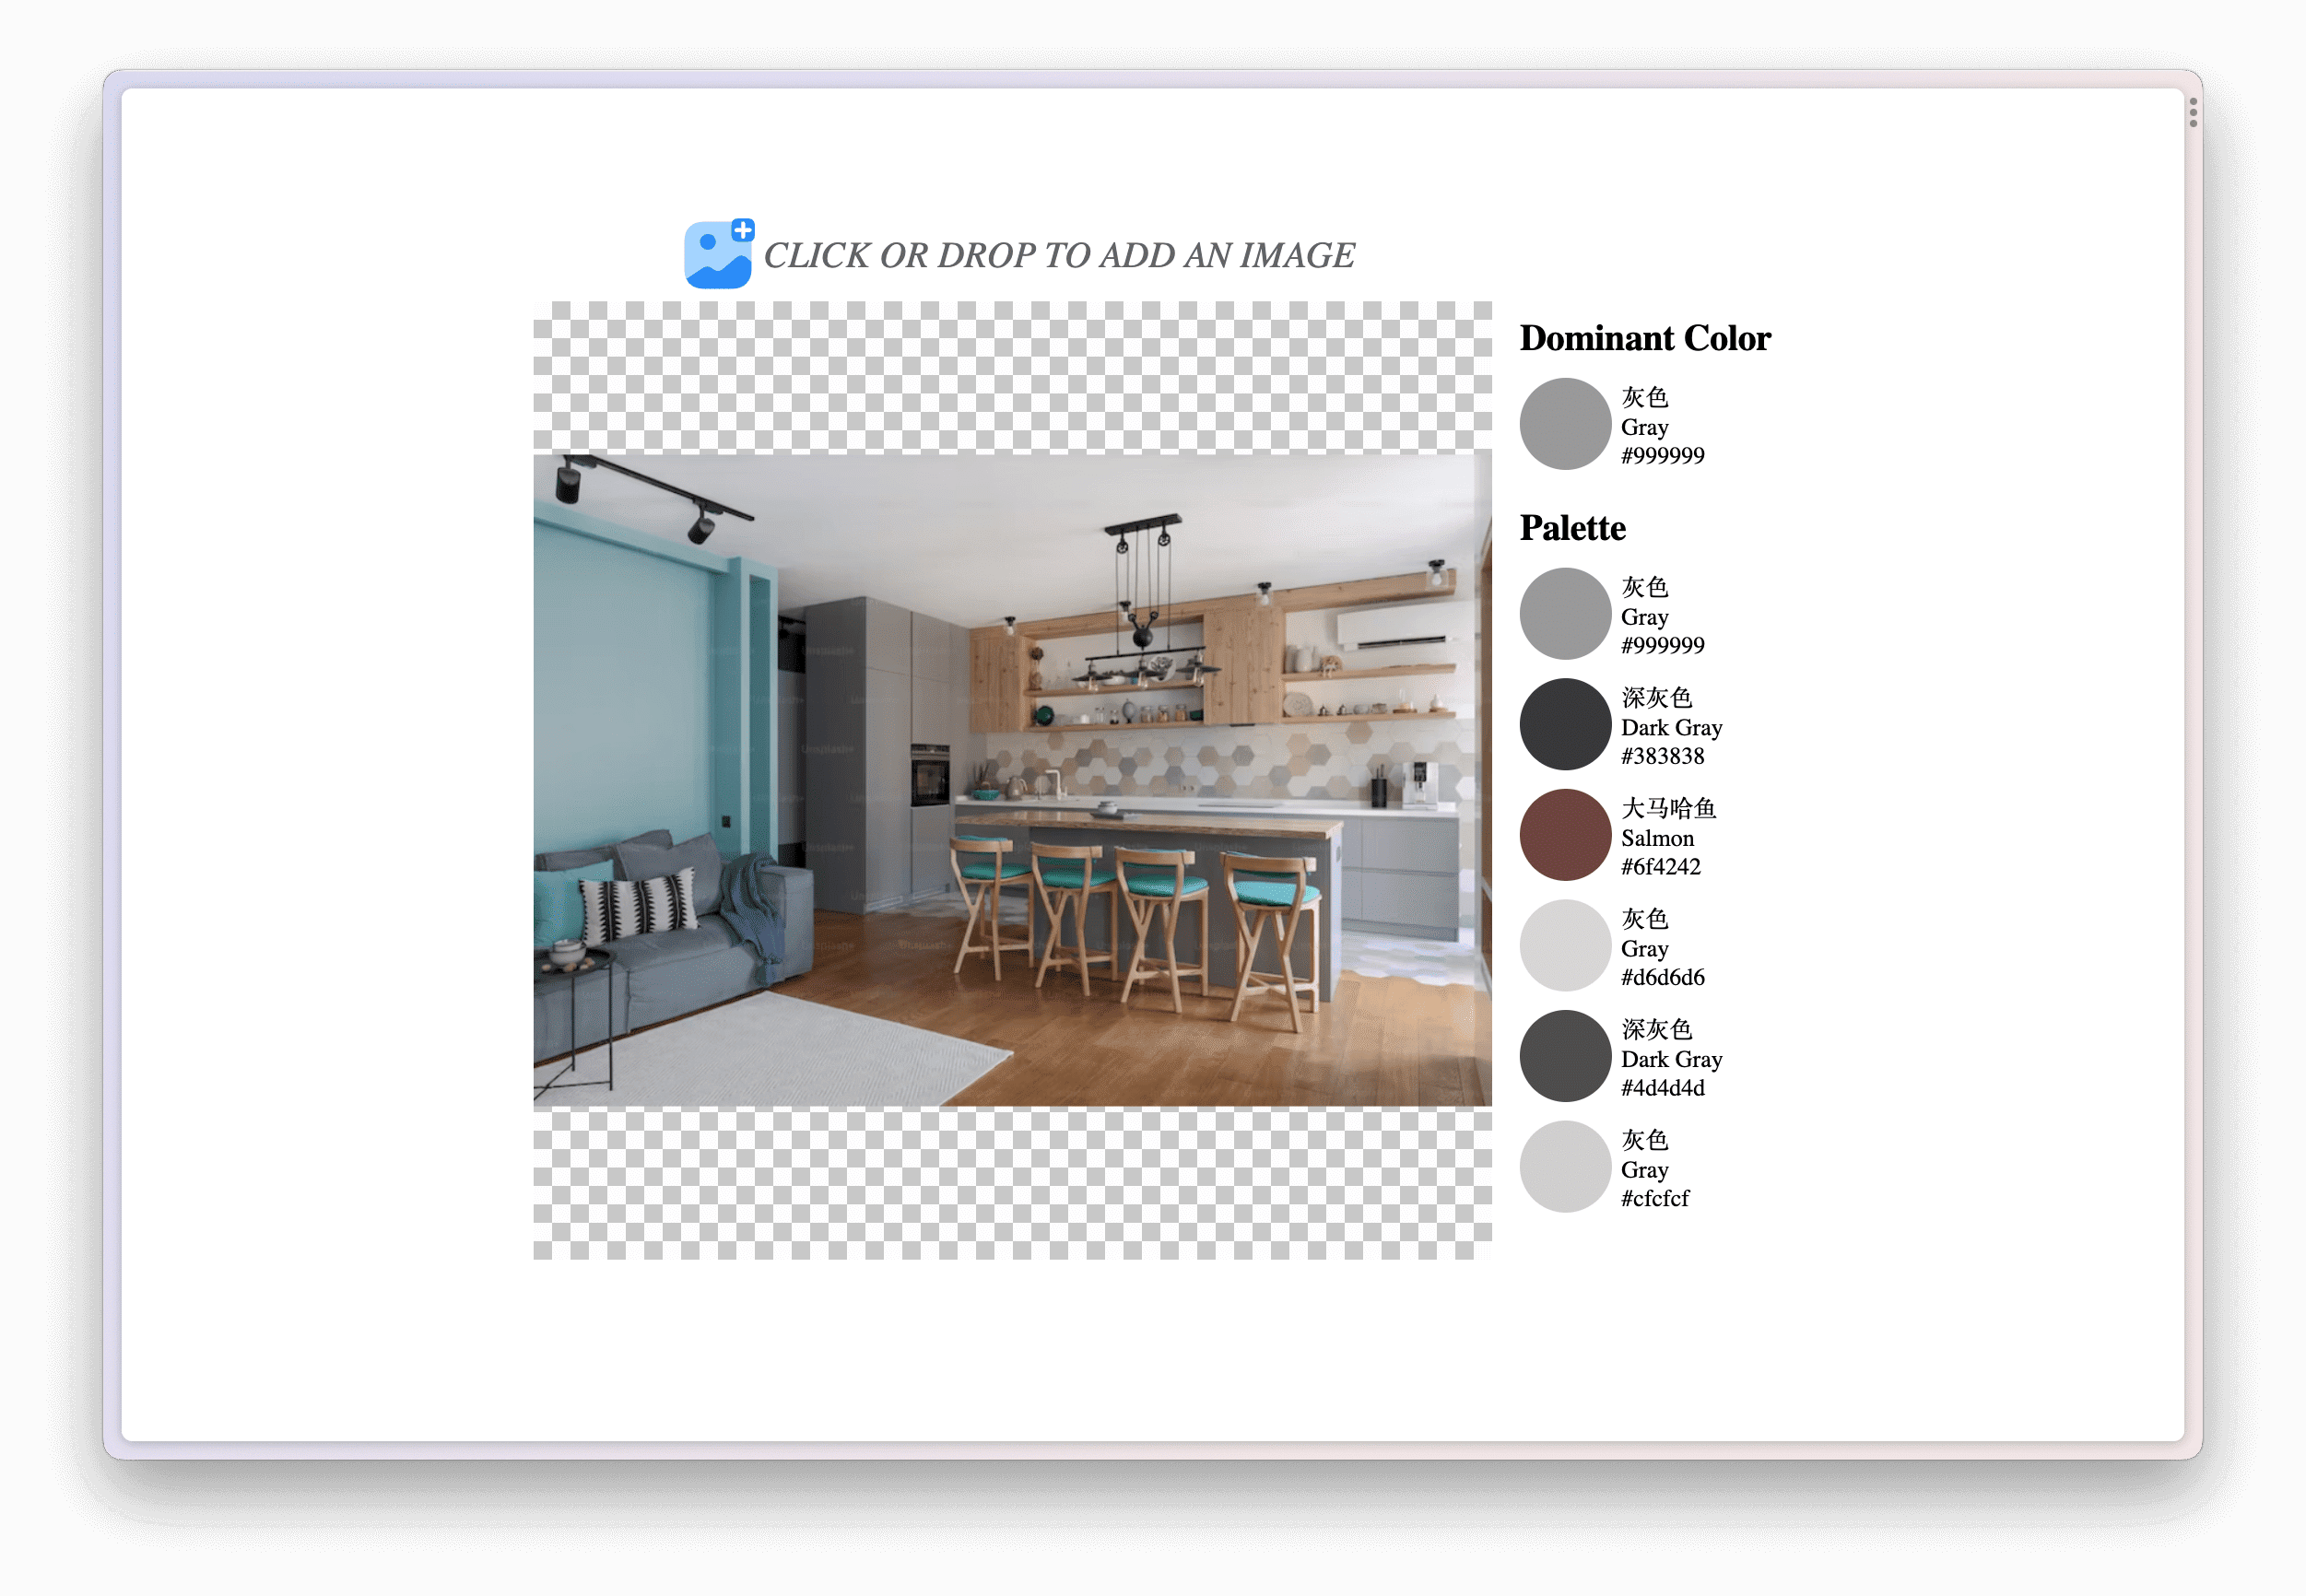
在用户交互界面上,中间区域放置了一个画布,用来显示需要拾色的图片。值得注意的是,我们的图片需要完整的显示在画布上,不能被拉伸或者压缩。使用下面的方法,我们就可以在画布上显示一张图片了。
1
2
3
4
5
6
7
8
9
10
11
12
13
14
15
16
17
18
19
20
21
22
23
24
25
26
27
28
29
30
31
32
33
34
35
36
37
38
39
40
41
42
| function init(url) {
this.selectedColor = null;
const img = new Image();
img.crossOrigin = "true";
img.src = url;
function drawImageScaled(img, ctx) {
const canvas = ctx.canvas;
const hRatio = canvas.width / img.width;
const vRatio = canvas.height / img.height;
const ratio = Math.min(hRatio, vRatio);
const centerShift_x = (canvas.width - img.width * ratio) / 2;
const centerShift_y = (canvas.height - img.height * ratio) / 2;
ctx.clearRect(0, 0, canvas.width, canvas.height);
ctx.drawImage(
img,
0,
0,
img.width,
img.height,
centerShift_x,
centerShift_y,
img.width * ratio,
img.height * ratio
);
}
img.onload = () => {
const canvas = this._.refs.canvas;
const ctx = canvas.getContext("2d");
drawImageScaled(img, ctx);
this.dominantColor = getColor(...colorThief.getColor(img), 1);
this.palette = colorThief
.getPalette(img, 6)
.map((color) => getColor(...color, 1));
};
img.onerror = () => {
alert(
"Error occored on loading your image, you may need to try with another image"
);
};
}
|
然后我们在画布上方的输入上添加事件监听器。
1
2
3
4
5
6
7
| onInputFile(e) {
const file = e.target.files[0];
if (file) {
const url = URL.createObjectURL(file);
this.init(url);
}
}
|
为了简化用户操作成本,我们还可以监控页面拖放事件。
1
2
3
4
5
6
7
8
9
10
11
12
13
14
15
16
17
| onDropFile(e) {
e.preventDefault()
const file = e.dataTransfer.files[0]
if (file && file.type.startsWith('image')) {
const url = URL.createObjectURL(file);
this.init(url);
}
}
const events = ['dragenter', 'dragover', 'dragleave']
function preventDefaults(e) {
e.preventDefault()
}
events.forEach((eventName) => {
document.body.addEventListener(eventName, preventDefaults)
})
document.body, addEventListener('drop', this.onDropFile)
|
需要注意的是:为了实现文件拖放,我们需要使用 e.preventDefault() 来阻止浏览器对于 dragenter、dragover、dragleave、drop 四个拖放事件的默认行为(当将图片文件拖入浏览器窗口时,浏览器会默认在新标签页中打开这张图片)。
通过指针单击获取颜色
当指针点击画布的时候,我们可以通过它的 click 事件属性来计算出我们点击在画布上的位置,从而获取这个位置的颜色数据。
1
2
3
4
5
6
7
8
9
10
11
12
13
14
15
16
17
18
19
20
21
22
23
24
25
26
27
28
29
30
31
32
33
34
35
36
37
| onCanvasClick(e) {
const canvas = this._.refs.canvas;
const ctx = canvas.getContext("2d");
const canvasWidth = canvas.clientWidth;
const x = ((e.pageX - canvas.offsetLeft) / canvasWidth) * 1000;
const y = ((e.pageY - canvas.offsetTop) / canvasWidth) * 1000;
const imageData = ctx.getImageData(x, y, 1, 1);
const data = imageData.data;
const colorCount = {};
let maxCount = 0;
let maxColor = "";
let maxColorRGB = "";
for (let i = 0; i < data.length; i += 4) {
const r = data[i];
const g = data[i + 1];
const b = data[i + 2];
const a = data[i + 3] / 255;
const color = getColor(r, g, b, a);
const colorHex = getColor(r, g, b, a).hex;
if (colorCount[colorHex]) {
colorCount[colorHex]++;
} else {
colorCount[colorHex] = 1;
}
if (colorCount[colorHex] > maxCount) {
maxCount = colorCount[colorHex];
maxColorRGB = `rgb(${r}, ${g}, ${b}, ${a})`;
maxColor = color;
}
}
this.selectedColor = maxColor;
}
|
附加功能:获取图像的主色调。
Color Thief 是一个 JavaScript 库,用于从图像中提取主色调。它的工作原理是采样图像像素,减少采样的颜色,最后根据它们的频率对它们进行排序,以确定图像的主色调。
致谢
- Color Thief
- RGB to Color Name Mapping (Triplet and Hex)